Skirting boards alternatives


#CraftedForLife
The traditional solution is to simply pin a strip of scotia wood trim against the wall, but this often ruins the clean lines of a premium floor installation. If you are looking for an elegant finish, here are the skirting board alternatives and installation methods to handle that flooring gap between wall and skirting.
New skirting
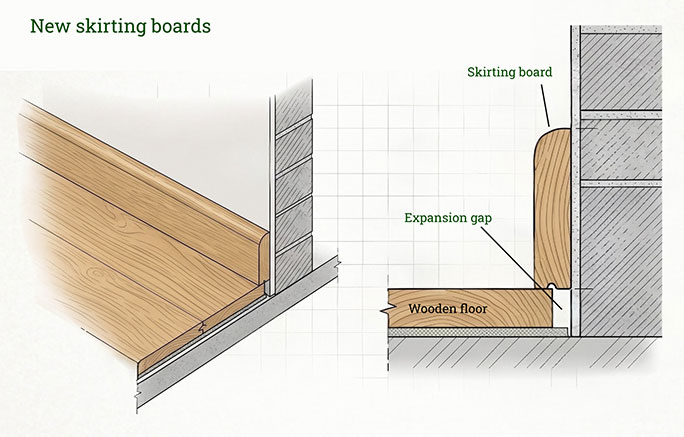
New skirting boards sit directly on top of a wooden floor, neatly covering the necessary expansion gap without trims
If you are undergoing a major renovation, the best option is to remove your old skirting boards, install your wooden floor, and fit brand-new skirting boards directly on top. This creates an architectural seamless wood flooring wall finish that fully covers the expansion gap without the need for awkward trims or beads.
During installation, fitting perfectly straight MDF or timber boards against uneven walls and sub-floors will inevitably result in minor gaps along the top, bottom, or joints. Don't worry—this is completely normal. The final finish relies heavily on the decorating stage, where a painter uses caulk, filler, sanding, and paint to erase these gaps entirely.
Note: Removing old skirting can occasionally cause minor plaster damage, but maximum care is always taken to keep this to an absolute minimum.
Undercutting skirting boards for wood flooring
For period properties or renovations where removing fragile, historic skirting boards isn't an option, undercutting skirting boards for wood flooring is the ideal way to achieve a seamless skirting board detail without extra mouldings. Using specialized equipment, our craftsmen meticulously cut a horizontal groove along the bottom of the existing skirting, allowing the new wood flooring to slide neatly underneath. Learning how to install wood flooring under existing skirting requires a high level of craftsmanship and patience, but it beautifully preserves the building's original character.
However, because this precise process is highly time-consuming, it comes with important practical considerations. Our craftsmen will proceed with caution to avoid hidden pipes or cables directly behind the boards. Additionally, the technique isn't always viable; if the skirting is under 90mm tall and the flooring is 20mm thick, the remaining timber becomes structurally weak and visually awkward, making a full replacement a better choice. Finally, because maneuvering the last few planks can cause minor chipping, expect to do a quick touch-up with wood filler and paint once the installation is complete.

By undercutting the existing skirting boards, new wood flooring slides underneath for a seamless finish

Scotia Beading (Why We Don't Recommend It)
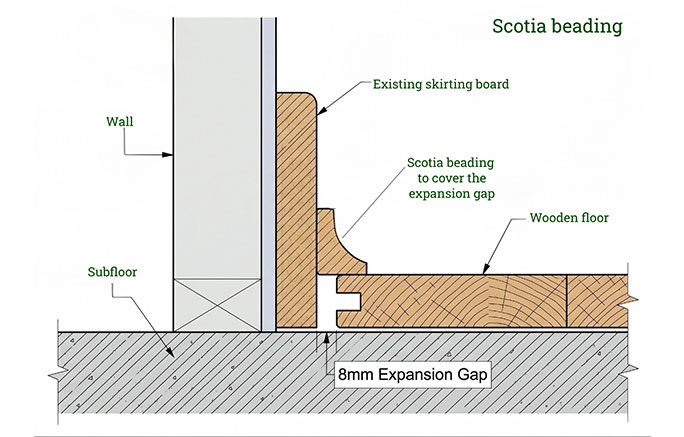
Scotia beading profile covering the flooring expansion gap against the existing skirting boards
When homeowners look for alternatives to scotia beading, it’s usually because they’ve seen it elsewhere and hated the look. Scotia—or quadrant—is a small, curved trim nailed to the base of the skirting board to cover the mandatory expansion gap left after a floor is laid. While this method was once the standard and remains a common DIY approach for fitting wood floors without removing skirting its popularity is rapidly declining and it is rarely used by true professionals.
We highly advise avoiding this option whenever possible. Adding a bead acts as a visual clutter line around the perimeter of your room, collects dust easily, and can give the floor a rushed, "DIY" appearance that screams "we took a shortcut here." If you are investing in premium engineered oak, capping it off with cheap beading significantly devalues the final aesthetic rather than offering the premium, flush finish of a truly professional installation. If you must use this method as a last resort, we strongly recommend painting the trim to match the skirting color. Please note that scotia beading is supplied only primed, so it will require a decorator to fill, sand, and paint it to achieve a finished look.
MDF Strip Overlay Flooring Trims
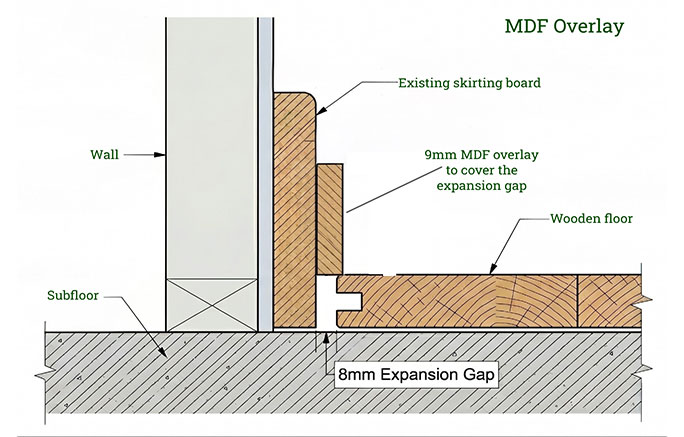
MDF overlay profile covering the flooring expansion gap against the existing skirting boards
A more discreet alternative to scotia beading, this method is used when existing skirting cannot be removed or undercut. The expansion gap is covered by a 9mm thin MDF strip, custom-cut on-site and fixed over the face of the existing skirting. While this delivers a much neater, flatter profile than beading, clients should consider two key disadvantages. Wall Clearance: It pushes the base profile outward, preventing furniture from sitting tightly against the wall. Future Flexibility: Because the floorboards are cut short of the existing skirting, any future skirting replacement will require another overlay strip to cover the permanent gap.
The shadow gap profile
For superior architectural projects, the "shadow gap" or "shadowline" alternative is the solution for refined interiors. Highly favored in modern architecture, this design detail completely eliminates the need for traditional skirting boards. Instead of a profile that sits proud of the wall, a specialized metal L-profile (often a plaster-in bead) is fitted to the base of the drywall before plastering. This creates a deliberate, low-profile horizontal channel where the wall meets the floor, restricting light and using natural shadow to elegantly mask the expansion gap. The wooden flooring simply terminates inside this recess, giving the striking optical illusion that the walls are elegantly floating or hovering just millimeters above your wood floor.
Achieving this flawless look requires meticulous planning from the very early stages of architectural design, as the walls must be specifically constructed to accommodate the bottom recess. It demands accurate precision from both the dryliners and our craftsmen to deliver such a complete sleek, flush skirting board detail. However, from a practical standpoint, this solution requires a lifestyle adjustment. Without traditional skirting boards to act as a barrier, the lower section of the walls is left completely exposed to scuffs, dirt, and accidental impact from daily activity, requiring significantly more care and precision during routine cleaning.
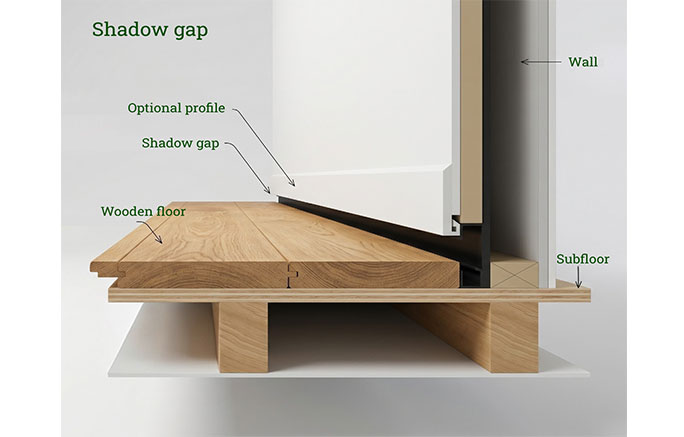
Shadow gap profile creating a floating wall effect over a wood floor allowing the expansion gap to be hidden
Simple joint of the wooden floor with walls using flexible filler or caulk
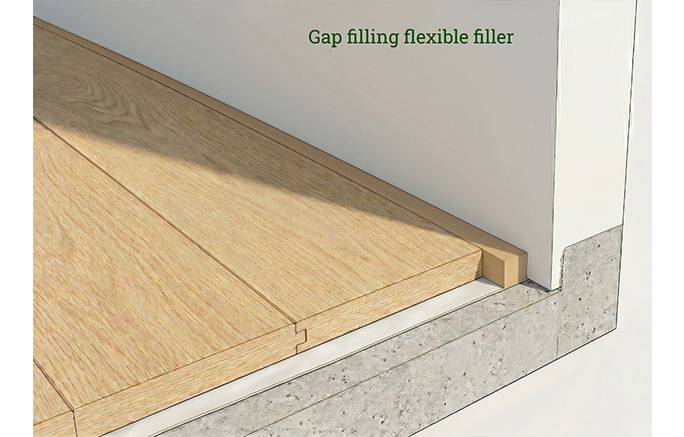
Minimalist wood floor installation without skirting boards, featuring an expansion gap filled flush with a flexible filler or natural cork strip
If your goal is uncompromised minimalism, without any skirting boards or profiles, you can opt for a simple joint where the wooden floor directly meets the wall. Popular in contemporary spaces, gallery designs, and industrial lofts, this approach requires cutting the wood flooring with absolute precision, leaving a minimal, uniform expansion gap along the wall. This gap is then filled flush using a specialized flexible sealant or a natural cork expansion strip, creating a raw, architectural transition that accommodates the floor’s natural movement.
However, while this delivers an incredibly clean look, it is the least frequently used alternative due to strict technical and practical limitations. It is only viable for highly stable engineered wood rather than solid hardwood, and it cannot be used in large, open-plan spaces where cumulative expansion would overwhelm the narrow gap. Practically, this finish offers no protection for the base of your walls, leaving the plaster vulnerable to scuffs and impact. Furthermore, both filler and cork can degrade, dry out, or dislodge over time, meaning the joint will eventually require long-term maintenance or replacement.