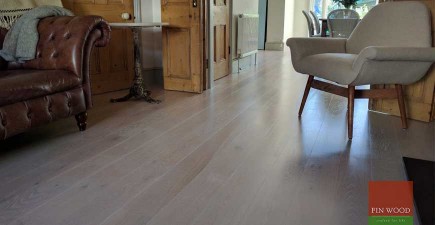
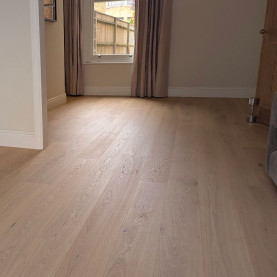
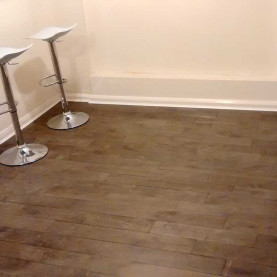
Wooden floors are expected to be solid and stable surfaces. Also they are expected to last for decades. At Fin Wood we endeavour to deliver wooden floors crafted for life that will look and feel good all throughout their life.
Wooden floors are expected to be solid and stable surfaces. Also they are expected to last for decades. At Fin Wood we endeavour to deliver wooden floors crafted for life that will look and feel good all throughout their life. To achieve this, beside other aspects we carefully choose the most suitable installation method for your wooden floor considering also any additional requirements given by the subfloor or future plans regarding your property.
Below we will go through all the wood flooring installation methods:
Glued Down Installation
Over the prepared subfloor wood flooring adhesive is spread with a V notched trowel always perpendicular to the board or parquet rows.
- Stability: very stable even on the lesser flat surfaces, as the adhesive once cured will hold down the floor, not allowing vertical movements.
- Subfloor type: screed, plywood, OSB, chipboard. Virtually on any flat, continuous and and sound subfloor without loose areas. There are some exceptions when the new wooden floor will be installed on wooden battens, sprung floor, or the subfloor is already covered with electric underfloor heating matts.
- Installation time: it a straight forward installation method, but requires care and attention so the adhesive will not end up on the new wooden floor. It can ruin the oil or lacquer finish if used by inexperienced and untidy fitter...
- Curing time: depending on the adhesive type it can take between one and three days for the adhesive to reach it's maximum strength for coping with high levels of traffic. Basically it can take very light traffic right after installation.
- Wooden floor types: all widths of boards, herringbone parquet, chevron parquet, Versailles panels, end grain parquet, industrial edge parquet, all as engineered wood or solid wood.
- Costs: on itself it can be expensive when compared with the other methods, if a quality adhesive is used. But on the other hand it can help lowering the overall budget by being suitable to most of the subfloors.
- Removal: Glued down wooden floors are hard to remove and the subfloor can be damaged during this process. By using this method the wooden floor will be totally fixed to the subfloor which is great of course but not when you intend to replace the wooden floor with each change of the fashion.
Floating Installation
Over the subfloor an underlay is spread which has the role of stabilising and cushioning the hardwood floor. There is no mechanical or chemical fixing of the wooden floor to the subfloor but the boards will be glued together with PVA adhesive in the groove or just locked together if the joint is a uniclic type. This installation method was initially used for laminate flooring as these types of floors are not suitable for fixing down and in time has become a preferred method for a large number of multiskilled, handymens, builders and many fitters that are more inclined to a fast track installation. Not to be used for solid wood flooring which has to be fixed down.
- Stability: has a tendency to be a bouncy floor. When stepping over the floor the foot pressure will cause the floor to be compressed down. There will be also a laminate like sound when stepping with harder shoes or dropping various objects over the wooden floor. The bounciness is more visible on surfaces that are not perfectly flat and even more if a cheap underlay is used.
- Subfloor type: screed, plywood, OSB, chipboard. Virtually on any flat, continuous subfloor. Can be a much better alternative on brittle screeds that are too weak to provide a good grip for adhesive. Not suitable when the new wooden floor will be installed on wooden battens, sprung floor but the best solution when the subfloor is already covered with electric underfloor heating matts.
- Installation time: it a straight forward installation method, much preferred and loved by multiskilled, handymens, builders and many fitters.
- Curing time: depending on the adhesive type it can take between one and three days for the adhesive to reach its maximum strength for coping with high levels of traffic. Very light traffic right after 12 hours from installation.
- Wooden floor types: Only engineered wooden boards but NOT herringbone parquet, chevron parquet, Versailles panels, end grain parquet, industrial edge parquet, solid boards.
- Costs: If a quality underlay that helps stabilising the floor is used it can get close to the cost of the glued down installation method but if a very cheap underlay is used which it can be the cheapest possible installation method but also the worst solution.
- Removal: very easy to remove and leaves the subfloor intact
Caution: we advise always to consider the glued down installation rather than floating and if floating is chosen then it should be for good reasons, not because is cheap or the inexperienced builder insists.
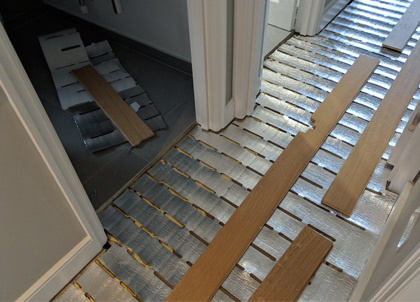
Hybrid between floating and glued down installation
A slatted underlay is spread over the subfloor and with a foil and cartridge gun, “sausage gun” adhesive is applied into the slots and the wooden floor will be laid over the underlay with adhesive. In this way despite the hardwood floor lays over the underlay the bounciness is cancelled by chemically fixing the floor with the adhesive. This installation method has been designed to offer the potential cost savings of a floating floor and also the stability of a glued down floor and when an acoustic underlay is used to provide impact sound insulation as well. For this last aspect we recommend to read Wood flooring and Soundproofing: an Expert Advice
Hybrid between floating and glued down installation
- Stability - a stable wooden floor but not as stable as a glued down floor since the adhesive used has to be flexible but as the quantity is smaller it cannot stabilise the wooden floor enough. The laminate like sound will still be present when stepping with harder shoes or dropping various objects over the wooden floor. If the floor will be subjected to high traffic the reduced amount of adhesive will not provide enough grip so the wooden floor will decuple and become very bouncy.
- Subfloor type: screed, plywood, OSB, chipboard. Virtually on any flat, continuous and and sound subfloor without loose areas. There are some exceptions when the new wooden floor will be installed on wooden battens, sprung floor, or the subfloor is already covered with electric underfloor heating matts.
- Installation time: quite demanding since first the undelay has to be spread and then the slots to be filled with adhesive. The installation process can become pretty messy at times because of the adhesive that has to be applied as high long ridges and when the wood elements are joined the adhesive can be pushed into the grooves or over the tongues.
- Curing time: Faster than the glued down installation method. The PVA glue reaches it’s maximum hardness in 18 to 24 hours but it will set in approx 30min. This means that the hardwood floor can take very light traffic right after installation.
- Wooden floor types: all widths of boards, herringbone parquet, chevron parquet, Versailles panels, all as engineered wood or solid wood but NOT end grain parquet and industrial edge parquet.
- Costs: because of the adhesive used în conjunction with the underlay the undelay can be less costly thus the final cost can be reduced but it may cause a workmanship cost increase as it requires more care and time than any other installation method.
- Removal: medium difficulty and the subfloor can be damaged during this procedure.
Caution: again we advise always to consider the glued down installation rather than a hybrid between floating and glued down since beside a possible small cost reduction does not bring any extra benefits but the contrary.
Secret nailing installation
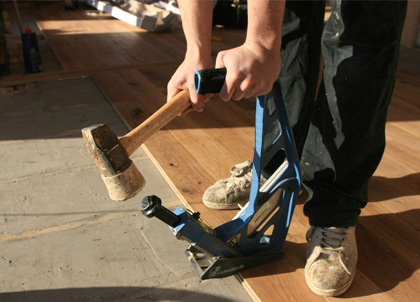
Secret nailing installation
A traditional very wide used installation method that started with the usage of the tongue and groove boards. With a flooring nailer a serrated nail is driven at a 45 degree angle above the tongue. The head of the nail will be covered by the groove of the next board.
- Stability - very stable on flat surfaces but since the nail has a limited length it will not get a grip in the lower sections of the subfloor thus a possibility of vertical movement and squeaks.
- Subfloor type: flat plywood, OSB, joists. Not suitable on screeded subfloors and underfloor heating systems.
- Installation time: it is simply the fastest.
- Curing time: since it is a mechanical fixing there is no curing time.
- Wooden floor types: only wooden boards engineered wood or solid and the narrower the better. The wider the board the higher the risk of movements especially for solid wood but even for engineered if on high traffic areas.
- Costs: it is the cheapest possible since the cost of the nails cannot be beaten even by the cheapest underlay.
- Removal: Secret nailed hardwood floors are hard to remove but not as hard as the glued down ones. The subfloor can be slightly damaged during this procedure
Caution: If the quality and density of the subfloor is low then squeakes cause by moving nails will appear. Also the cheaper non serrated nails will cause squeaks even on the best wooden subfloor.
Tongue Screwed installation
The almost identical alternative to secret nailing. It involves screwing special flooring screws at a 45 degree angle above the tongue. The small head of the screw will be covered by the groove of the next board

Tongue Screwed installation
- Stability - very stable on flat and even on not so flat surfaces as the thread of the screw will provide a great grip into the subfloor.
- Subfloor type: flat plywood, OSB, joists. Not suitable on screeded subfloors and underfloor heating systems.
- Installation time: it is less faster than secret nailing but still faster than the other methods.
- Curing time: since it is a mechanical fixing there is no curing time.
- Wooden floor types: only wooden boards engineered wood or solid and the narrower the better. The wider the board the higher the risk of movements especially for solid wood but even for engineered if on high traffic areas.
- Costs: it is cheap but still a bit more expensive than using the secret nailing installation method due to the cost of the special screws
- Removal: The hardwood floors installed this way are hard to remove but not as hard as the glued down ones. The subfloor can be damaged during this procedure as the screws might pull up the weaker areas of the subfloor
Caution: During the installation process there is a high risk of damaging the boards surface by accidentally missing the screw head with the drill bit.
Screw and Dowel installation
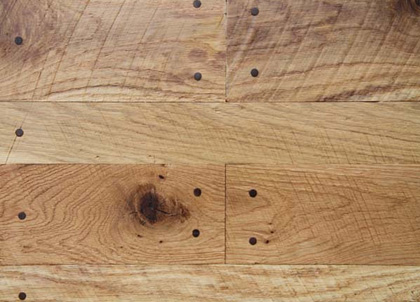
Screw and Dowel installation
Another traditional installation method even older than the secret nailing and it works for all types of wooden floors with or without tongue and groove boards. Once the board or wood block is laid a pilot hole is drilled and then enlarged with a countersink bit. The screw is driven through the hole fixing down the wood. To cover the hole a wood plug ideally made from the same wood will be pushed in the hole. The wood plug has to be the same diameter as the hole. The remaining tip of the plug above the wood surface will be cut with a precision saw to avoid scratching the floor.
- Stability - very stable even on uneven surfaces since the screws length can be chosen as needed so the wood will be securely fixed.
- Subfloor type: flat plywood, OSB, joists. Not suitable on screeded subfloors and underfloor heating systems.
- Installation time: one of the slowest considering the extra work that is required for each screw and making the dowels.
- Curing time: since it is a mechanical fixing there is no curing time.
- Wooden floor types: only wooden boards or parquet blocks engineered wood or solid of any width.
- Costs: although the screws are not a major cost due to the extra labour involved it can become expensive depending on the size of the parquet blocks or boards.
- Removal: Easy to remove and with minimum damage to the subfloor if removed carefully by unscrewing each screw.
Caution: This hardwood floor installation method can be used only on unfinished floors which will have to be sanded and treated after installation. The multitude of “dots” on the floor where the dowels are will create a rustic look.
Sprung installation
Mainly used for large hardwood floors in ballrooms, dance and sports halls. Sprung floors are softer than the chemically or mechanically fixed down wooden floors but still very stable compared to the floating floors. One of the oldest sprung wooden floor in UK is in Accrington Conservative Club, built in 1890 located in the Grand Ballroom that holds up to 1000 guests.
In recent times the method of installation has diversified but the majority of the sprung wooden floors are still built on three basketweave layers of battens.
- Stability - intentionally the stability of these floors is precisely decreased to allow the right level of flexibility.
- Subfloor type: screed, plywood, OSB, chipboard. Virtually on any flat, continuous and and sound subfloor without loose areas. There are some exceptions when the new wooden floor will be installed on wooden battens, sprung floor, or the subfloor is already covered with electric underfloor heating matts.
- Installation time: depends on the specific requirements given by the future use of the wooden floor.
- Curing time: since it is a mechanical fixing there is no curing time
- Wooden floor types: wooden boards engineered wood or solid of narrow width.
- Costs: depends on the specific requirements given by the future use of the wooden floor.
- Removal: difficult to remove
In this article we have been focusing strictly on the wooden floors installation methods. Beside this we recommend reading the other blog posts in the Expert Advice category and before starting any hardwood floor fitting a site assessment has to be carried out.