
Stair Cladding - Modern look
Stair Cladding - Modern look: the modern cladded stairs look solid and pure. They possess a strong sculptural quality and have a very commanding presence in the overall design. These stairs, as beautiful as they are,...


Executed correctly, a floor transition disappears into the architecture, creating an effortless visual flow throughout your home. Executed poorly, it disrupts the entire aesthetic of the space. Below, we share our expert approach to achieving flawless transitions across wood, tile, carpet, level changes, bi-fold doors, and staircases.
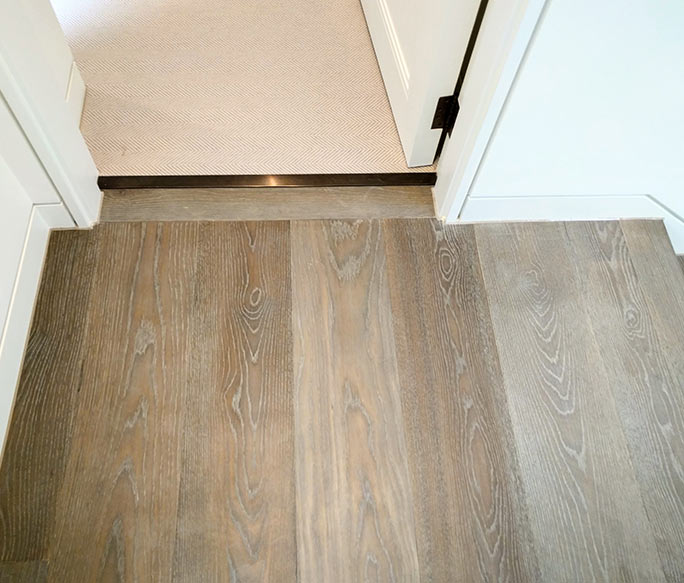
A doorway threshold should mark a precise boundary between two spaces without drawing unnecessary attention.
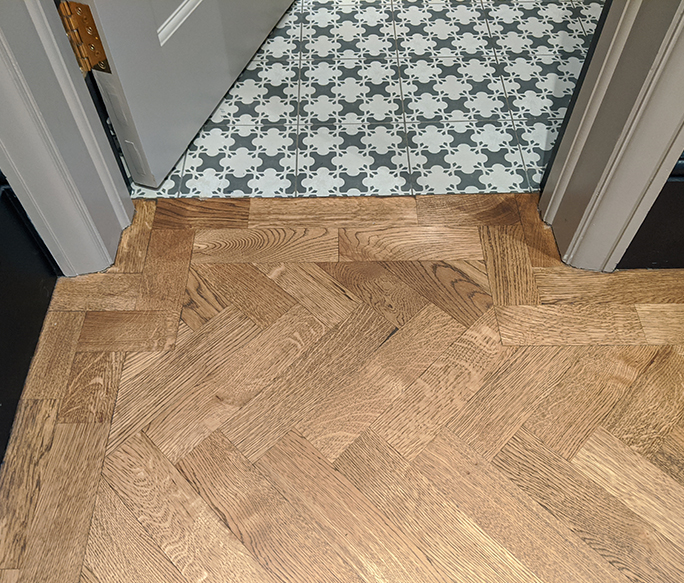
Flush doorway transition between oak parquet floor with perimeter border and patterned tiles directly beneath the door line.
When a door is closed, you should only see the flooring of the room you are currently in. The line of
transition—whether meeting porcelain tile, marble, carpet, or another wood finish—must sit directly beneath the centre of the door leaf.
Where possible, we avoid bulky wood or metal door strips or raised cover profiles. By carefully calculating subfloor heights, we bring the hardwood and adjacent materials (such as kitchen or hallway tiles) to the same millimetre level.
![]()
Flush doorway transition with oak chevron parquet and timber threshold strip meeting geometric floor tiles at precise level.
Managing Wood Movement: Because wooden floors, especially solid wooden floors naturally expand and contract with seasonal humidity fluctuations, a flush transition must incorporate a 3–5mm expansion movement joint. We fill this with a flexible, colour-matched acoustic sealant or discrete cork strip to absorb subfloor movement without sacrificing aesthetics. This is not required, however, for boards laid perpendicular to the joint line, as wood does not expand lengthwise.
Early Multi-Trade Coordination: Flawless flush joins start before the wooden floor is laid. We can work in close coordination with your main contractor, interior designer, or tiler to establish exact Finished Floor Levels (FFL) across concrete screeds, underfloor heating mats, decoupling membranes and other various surfaces.
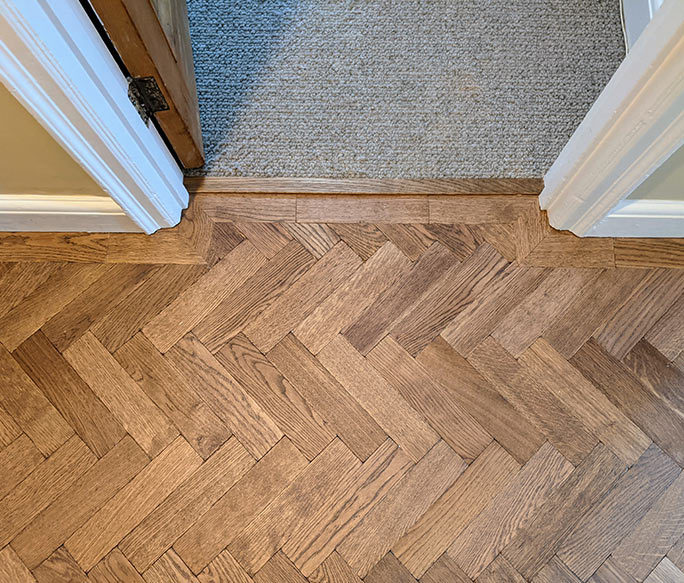
Oak herringbone parquet floor transitioning to carpet at a doorway via a custom wooden threshold bar.
When transitioning from hardwood to plush bedroom carpeting, we avoid generic metal bars. Instead, we craft concealed wooden door trims or inset threshold bars finished in the exact shade of your wooden floor, allowing the carpet to tuck neatly without exposed gripper rods.
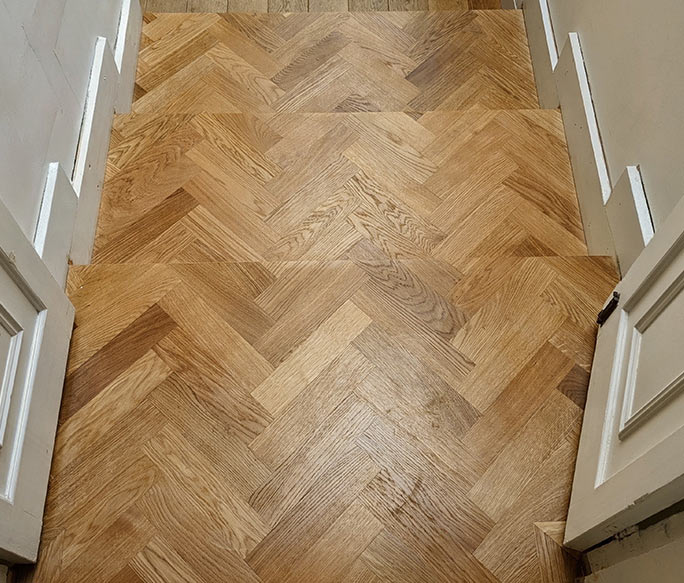
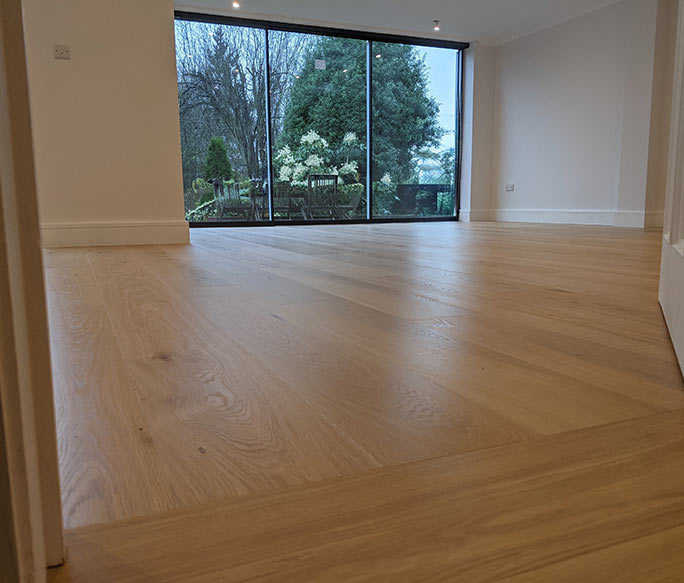
Oak herringbone parquet floor framed by a single perimeter border meeting stone tiles at a doorway threshold.
For a clean, contemporary look, board runs can extend straight to the transition line. Alternatively, framing the room with a perimeter border creates a tailored, classic frame before transitioning to tile or stone.
Variance in subfloor levels between old and new building sections is a common architectural challenge. When resolving height discrepancies, two primary techniques apply: blending slight gradients or crafting bespoke mini-steps.
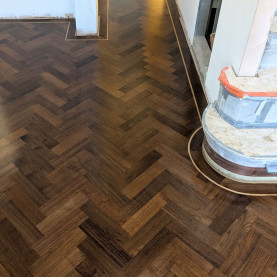
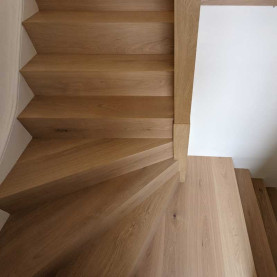
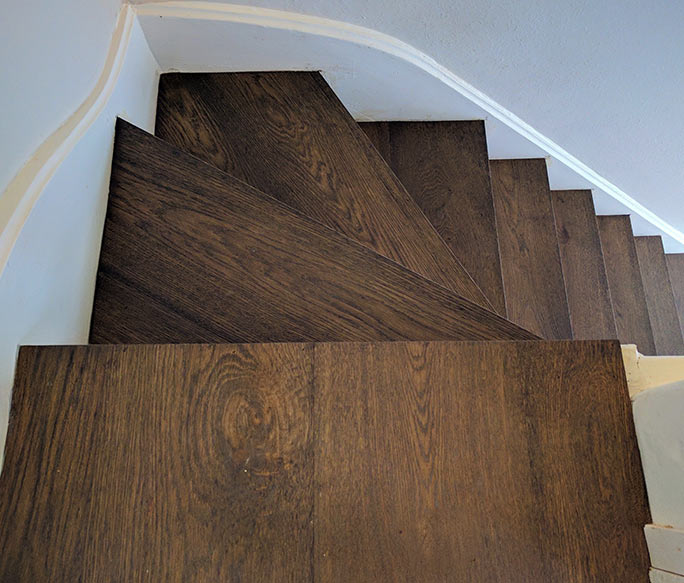
Oak herringbone parquet steps featuring continuous pattern alignment and precision hand-crafted mitred riser edges.
When height variations are minor (a few millimetres), we can gently ramp and blend the subfloor across a transition zone. This creates a smooth slope that maintains door clearances without creating a tripping hazard or visually breaking the wooden floor.
For noticeable variations in level, a dedicated mini-step provides both a practical and visually striking solution:
Invisible Mitred Joins: To maintain an uninterrupted aesthetic, we avoid using surface-mounted nosings or plastic trims. Instead, we hand-craft step transitions by precision-mitring the wooden tread and riser at a 45-degree angle. Slotting the pieces together produces a discreet, bevelled mitred return edge.
Oak plank floor continuing pattern alignment seamlessly across a mini-step transition into a living area.
Continuing Parquet and Plank Patterns: When transitioning over a step—whether working with chevron, herringbone, or straight planks—the visual flow of the pattern should align across both levels so the eye reads it as one continuous surface.

Connecting internal hardwood floors to outdoor patios or decking through bi-fold or sliding glass doors is one of the most sought-after modern extension features. Achieving a true flush threshold requires close planning during the structural build phase.

Oak wood floor meeting a sliding glass door frame at a perfect flush threshold level.
Flush Subfloor Planning: The ideal scenario occurs when the top of the finished wooden floor (FFL) sits perfectly flush with the lower track of the bi-fold frame, allowing indoor living areas to flow out to the terrace without obstruction.
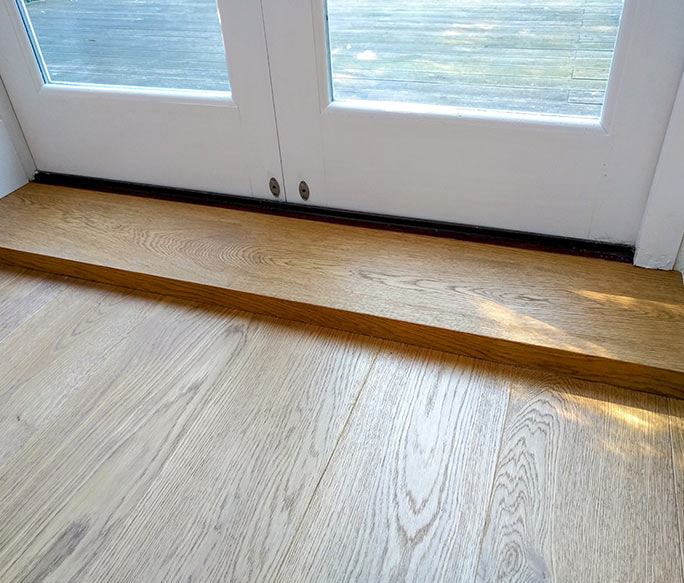
Oak floor with a custom bespoke wooden step transition leading to a raised patio door frame.
Managing Raised Door Frames: If drainage tracks or exterior weather seals require the frame to sit higher than the internal slab, we craft a custom wooden step or profiled riser rather than leaving an unfinished gap or exposed frame edge.
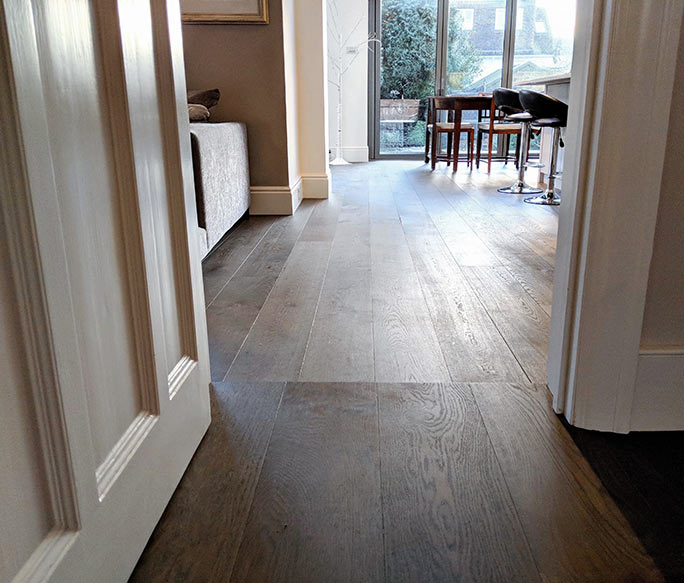
Changing the direction of wooden boards between rooms is often necessary—and can also serve as an intentional design statement.
Oak floor directional change at a doorway, running towards natural light from adjoining windows.
As a master rule, hardwood boards and parquet blocks should be laid towards the room’s primary source of natural light. If a hallway runs perpendicular to a bright adjoining bedroom or living space, changing the direction of the wood at the doorway ensures that incoming daylight highlights the natural depth and character of the wood rather than casting shadows over bevelled edges.
![]()
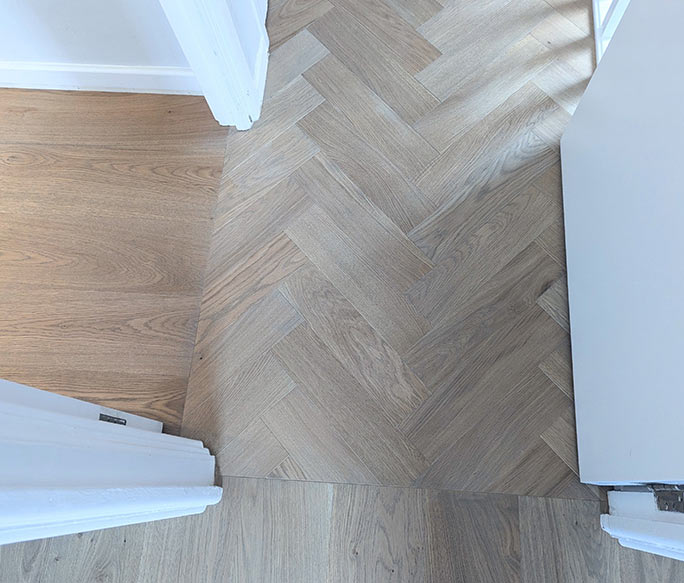
Oak chevron parquet hallway floor transitioning to wide straight planks at a doorway threshold.
You can also leverage directional changes to define different zones within an open-plan layout:
Combining Patterns: Transitioning from a chevron oak hallway into wide straight planks in a living area creates a refined architectural distinction.
Oak herringbone parquet meeting straight oak planks at a doorway, unified by identical tone and finish.
Unifying the Finish: The secret to pairing contrasting floor patterns successfully is consistency in tone. By utilizing the exact same oak species, grade, and custom stain finish across both styles, the pattern shifts naturally while the colour harmony remains untouched.
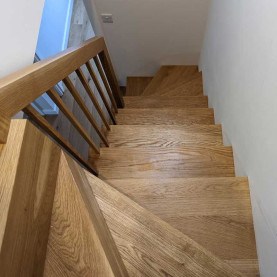
Stairs are among the most prominent architectural features in a home. Unlike a flat floor viewed primarily in two dimensions, the transition between a wooden floor and a staircase is visible from multiple angles and subject to heavy daily foot traffic.
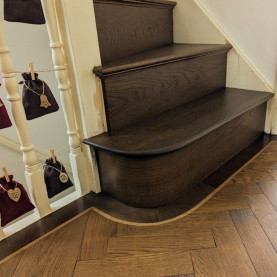
Dark oak staircase landing connecting seamlessly to cladded steps with a minimalist, profile-free nosing.
To maintain a clean, sculptural aesthetic, we minimize or eliminate heavy, off-the-shelf stair nosing trims wherever possible.
Seamless Landing-to-Tread Joints: For a modern, minimalist finish, we connect the landing floor directly into the topmost cladded step using precision-milled tongues and grooves or a slim, custom-matched nosing profile.
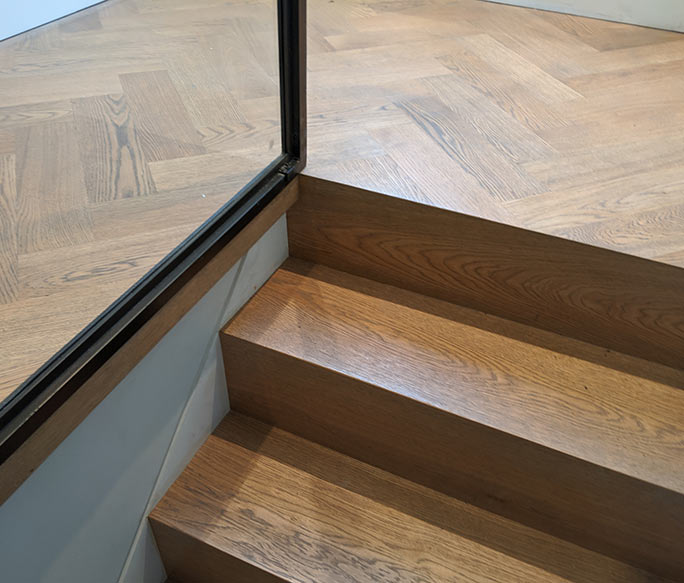
Oak herringbone landing floor connecting securely to modern cladded stair treads with a glass balustrade.
Structural Durability & Safety: Because stair landings endure intense lateral pressure, these transition joins must be permanently bonded and reinforced. We combine high-tensile flexible adhesives with custom wood tongue inserts, ensuring a joint that remains silent, secure, and flush for decades.

Oak stair cladding on a classic staircase seamlessly matching the grain and oil finish of the landing floor.
Architectural Harmony: Whether executing modern stair cladding with floating treads or a classic staircase with painted risers, matching the wood grade, grain alignment, and hand-applied oil finish between the floor and the stairs creates a cohesive architectural link across storeys.

Please sign in first.
Sign in